
6 Simple Steps to Close Out a Year in QuickBooks Desktop
Contents
How to Close Out a Year in QuickBooks Desktop
Closing the books at the end of the year is an important task for any business using QuickBooks Desktop. This desktop-enabled software ensures that your financial records are accurate and up-to-date and helps you prepare for tax season.
In this article, we'll walk you through the steps for how to close books in QuickBooks Desktop.
Step 1: Review Your Books
Before evaluating Quickbooks year end closing, you'll want to make sure that all of your financial transactions are accounted for and that your books are in order.
Here are a few things you should consider when reviewing your books:
Reconciling your bank and credit card accounts:
Ensure that all of your financial transactions are accounted for and that your bank and credit card statements match the transactions recorded in QuickBooks.
If there are any discrepancies, you'll need to resolve them before Quickbooks year-end closing.
Reviewing and adjusting outstanding transactions:
Look for any transactions that are marked as “outstanding” or “pending,” such as checks that haven't been cashed or payments that haven't been received.
Make sure that these transactions are properly accounted for and adjust them as necessary.
Resolving any discrepancies:
If you find any discrepancies or errors in your financial records, take the time to resolve them before Quickbooks close the year.
Resolving discrepancies could include correcting mistakes in your transaction entries, adjusting account balances, or reconciling differences between your records and your bank statements.
Step 2: Back Up Your Data
Before you make any changes to your QuickBooks file, it's a good idea to back up your data. This will allow you to restore your file if anything goes wrong during the closing process.
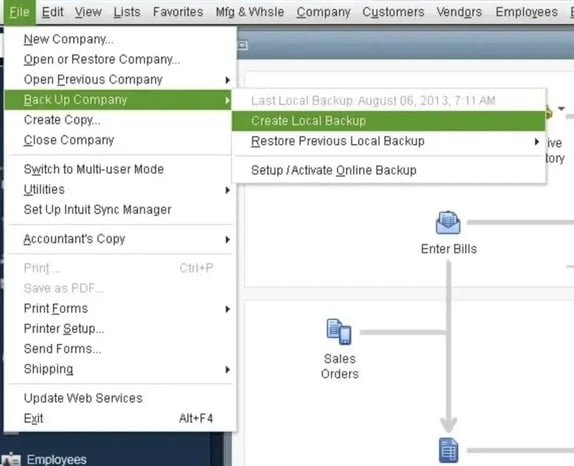
To back up your data, go to the "File" menu and select "Back Up Company." Choose the location where you want to save your backup file and click "Save."
Note: These images may be subject to copyright.
Here are a few things to consider when backing up your data:
Choose a secure location
Choose a location to save your backup file that is secure and safe from potential data loss, such as an external hard drive or a cloud storage service.
Test your backup file
After creating your backup file, it's a good idea to test it to make sure it can be restored. To do this, close QuickBooks and then try to restore the backup file. If you are able to open and access the file, you can be confident that your backup was successful.
Keep multiple copies
It's always a good idea to have multiple copies of your backup file in case one becomes lost or damaged. Consider saving copies of your backup file in multiple locations, such as on an external hard drive and in the cloud.
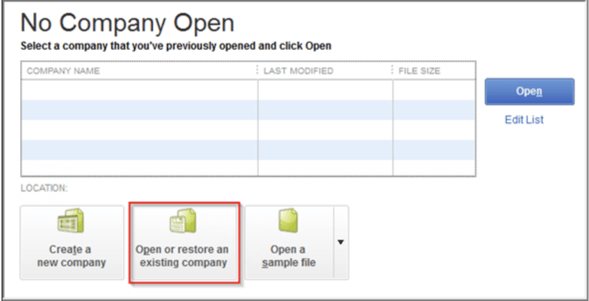
Step 3: How to Close a Year in QuickBooks
Once you've reviewed your books and backed up your data, it's time to close out the year.
To do this, go to the "Lists" menu and select "Chart of Accounts." Then, click on the "Account" dropdown menu and select "Year-End Closing." This will display a list of all of your accounts.
For each account, you'll need to specify whether it will be closed or carried over to the next year. To close an account, select "Close" from the "Year-End Closing" dropdown menu. To carry it over to the next year, select "Carry Over."
Note: These images may be subject to copyright
Closing out the year is an important step because it helps to ensure that your financial records are accurate and up to date. It also allows you to start a new year with a clean slate, making it easier to track your financial performance going forward.
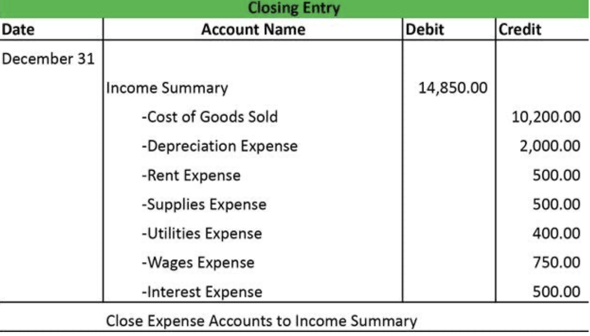
Step 4: Review and Verify Your Closing Entries
After you've closed or carried over all of your accounts, QuickBooks will generate a report showing the closing entries that will be made to your financial statements.
Review this report carefully to ensure that everything is accurate. If you need to make any changes, you can do so by going back to the "Chart of Accounts" list and adjusting the closing entries for each account.
Some of the closing entries you may need to check include:
Annual profit-losses report
This statement portrays your organization’s financial position during a specific period, typically at the end of a fiscal year. It includes information about your assets (such as cash, inventory, and property), liabilities (such as loans and debts), and equity (the difference between your assets and liabilities).
The income statements
This statement shows your business’s finances, expenditures, and gains over a given time frame, typically an annual counting calendar. It shows how much money your business made, how much it spent, and how much it earned or lost.
The cash flow statement
This statement shows the movement of cash into and out of your business over a specific period of time. It includes information about your cash inflows (such as sales and loans) and cash outflows (such as expenses and investments).
Step 5: Finalize Your Closing Entries
Once you're satisfied with your QuickBooks close year entries, it's time to finalize them.
To do this, go to the "File" menu and select "Utilities." Then, select "Verify Data." QuickBooks will perform a check to make sure that your data is correct and that all of your accounts are balanced.
If everything checks out, you'll be prompted to "Finalize Data." Click on this option to complete the closing process.
Step 6: Update Your QuickBooks File
After you've finalized your closing entries, you'll need to update your QuickBooks file to reflect the new year.
To do this, go to the "Edit" menu and select "Preferences." Then, go to the "General" tab and update the "Fiscal year" setting to the new year. Click "OK" to save your changes.
Note: This image may be subject to copyright
That's it! You've now successfully closed out the year in QuickBooks Desktop.
Since you’re still on desktop, share your QuickBooks Desktop files with remote users with Qbox. With Qbox, you’ll ditch the hassles of Accountant’s Copies, hosting, flash drives, or driving between offices. Learn more about how to collaborate with your team, by visiting our page. New users can sign up and get their first 30 days free.