
Top 10 Best Practices: How to Void a Check in Quickbooks?

Contents
How To Void a Check In Quickbooks?
QuickBooks is an online accounting software packed with a lot of useful features. It was introduced in 1983 and has become a valuable tool for many accounting and bookkeeping professionals all over the world. Among the several useful features of QuickBooks includes knowing how to void a check in Quickbooks.
It is fairly easy to learn how to void a check in QuickBooks. All you need to do is to follow the steps presented later in this post. But when should you void a check in QuickBooks? You can void a check in QuickBooks when the check hasn’t been cashed.
Is it Better to Void or Delete a Check in QuickBooks?
Let’s go into greater details for the benefits of knowing how to void a check in Quickbook. Voiding a check changes the amount of the check to $0.00. VOID is added to the Memo field. You can always re-enter a voided check. Void a check if you want to keep a record of the check in QuickBooks.
Deleting a check completely wipes off the recorded transaction from QuickBooks. It’ll seem as if the transaction never occurred. Once a check is deleted, there is no way to bring it back into QuickBooks. However, it is possible to re-enter a deleted check.
Understanding how to void a check in Quickbooks is important for users and business owners. Voiding is preferred to deleting because it ensures an accurate record of all your transactions (since the details of the check are still in QuickBooks). The only instance a check should be deleted is if you accidentally duplicate an entry. For example, if you forget you’ve earlier entered check #1222 for $91 and mistakenly enter it again. This is important information to learn how to void a check in QuickBooks.
How to Write a New Check in QuickBooks
To write checks, go to the Banking menu and select Write Checks. The other procedures are explained in the illustration below.
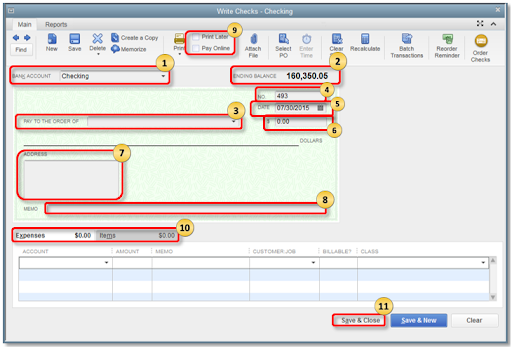
- Bank Account: The account where the cash will be withdrawn.
- Ending Balance: The account’s balance as of the date the check was written
- Pay to the Order of: Enter the payee name or whoever you are issuing the check for.
- No.: This number is generated according to the check number preference you set in QuickBooks.
- Date: Enter the date you are issuing the check.
- Amount: Enter the check amount in figures. As soon as you enter the amount, it will be automatically shown in words in the Pay to the Order field.
- Address: The payee address entered here is automatically generated from the payee name setup.
- Memo: You can leave the Memo field blank, albeit it mostly serves as an unofficial note for additional information such as the account information, the period, and the purpose of the payment.
- Print Later or Pay Online: check the Print Later box if you intend to print the check later or the Pay Online box if you want to process an online payment.
- Expenses and Items Tab
- The Expense tab is where to enter liability payments (in cases of payments for liabilities/loans), shipping charges, and other expenses that are not associated with any item in QuickBooks.
- The Item tab is used to select the appropriate item from the drop-down list.
- Click on Save & Close.
Written Check: How to Void a Check in QuickBooks
- Click on the Banking menu and then on Use Register.
- From the drop-down list, select the account you used to write the check.
- In the Bank Register, select the check.
- Click on Edit and then on Void Check.
- Finally, click on Record.
How to Void a Blank Check in QuickBooks
- Create a check with $0.00 as the amount.
- Provide a payee name, and assign an account in the Expenses section.
- Click on Edit and then on Void Check.
How to Void a Bill Payment Check in QuickBooks
- Initiate the transaction.
- Click on Edit and then on Void Bill/Void Bill Pmt-Check.
How to Void From Multiple Bill Payment Checks in QuickBooks
- Select the Lists menu, then Chart of Accounts.
- Double-click on the appropriate Accounts Payable account to open its register.
- In the Accounts Payable register, choose the particular bill payment check.
- Click on Edit and then on Void Bill Pmt-Check.
- Click on Record and then on Yes, to save the changes.
Payroll: How to Void a Check in QuickBooks
- Navigate to the Payroll menu.
- Click on the Employees tab and then on the Paycheck list.
- Choose the paycheck you want to void, then click on Void.
- Click on Yes to confirm the action.
How to Reissue a Voided Check in QuickBooks
You can reissue a voided check by recreating it. Here’s how to go about this.
- Click on + New and then on Check.
- From the dropdown menu▼, select the Payee.
- From the Bank account dropdown ▼, choose the account from which the check withdraws money.
- Provide the needed details in the check fields
- Check the Print option if you want to print the check now or the Print Later checkbox if you intend to print it later.
- Click on Save and close to close the check window or Save and new if you want to create another check.
Note: Selecting a save option not only adds the check to your bank register but also sends it to the print queue if you selected Print Later.
How to Delete a Check
- Click on Banking and then on Use Register.
- From the drop-down menu, select the account you used to write the check.
- In the Bank Register, select the check.
- Click on Edit and then on Delete Check.
- Lastly, click on Record.
 Qbox: The Best QuickBooks Desktop Remote Access Solution
Share QuickBooks Company files (QBW files) and document files like TLG, PDF, JPEG, PNG, TIFF, and others with Qbox, a cloud-enabled collaboration software that enables Windows PC users to share files across the internet. You can use Qbox to share QuickBooks files with a large variety of users, including accountants, bookkeepers, and clients.
The Qbox ‘Archive folder’ acts as a storage medium for QuickBooks attachments. QuickBooks keeps attachments in individual folders inside a folder known as “Attach”, located in the same directory as the Company file. This folder can be shared or created in Qbox and configured as an Archive folder to sync the attachments created in QuickBooks by any of the users.
Qbox is not compatible with only QuickBooks. It also has a host of other functionalities and works well with MS Word, Excel, Assess, and PowerPoint. Files can be accessed on Windows-operated devices such as desktops, laptops, and tablet computers. Sign up for Qbox now and learn more about how to integrate Qbox and QuickBooks! New users get a free 30-day trial!